|
INTRODUCTION After completing the initial shrinkage experiments I decided that I needed to practice on larger pieces than gauntlet fingers in order to refine my skill. This, coupled with a series of heavy bruises to my thighs determined the first items of armour to be made! |
|
|
CUISSES/THIGH ARMOUR After considerable research on appropriate thigh armour for my period, I adapted a pattern for steel cuisses by Sir Paul of Sommerton (Patrick Woolery1). Padded cuisses were also constructed (see below). The original pattern was constructed of corrugated cardboard which was then taped into position. After performing all the movements which might occur in a fight, the cardboard was removed and trimmed at the edges where bend lines appeared. This process was repeated until the armour sat comfortably and moved without pinching. The trimmed cardboard pieces were then used as templates for the legs - each one being slightly different after trimming (perfect bi-lateral symmetry is rare among humans!). An allowance of 1 cm was added to all edges as a guesstimate to cover shrinkage. |
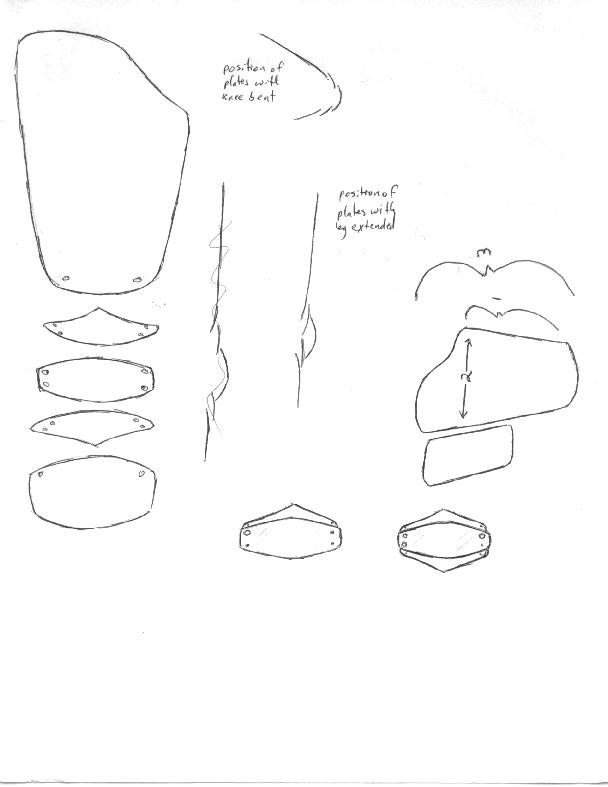 Cuisse pattern |
|
The Cuir Bouilli Process In an ideal world I would have the skills to make, or have access to, wooden forms on which to shape the cuisses after they came out of the water. I didn�t, so my own legs had to provide the "form". In that other world I would also have had a big enough element and a big enough pan to immerse all the leather at once. I didn�t have those either, only an ordinary kitchen stove and an enamelled roasting dish approximately 30.5 cm x 38 cm (12" x 15"). Materials
|
|
|
Preparation Cuir Bouilling
|
|
|
Forming the front of the Cuisse |
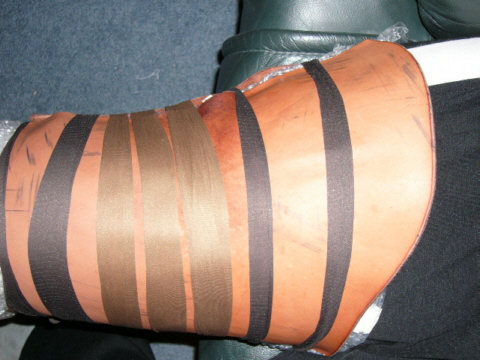 Cuisse strapping to shape |
|
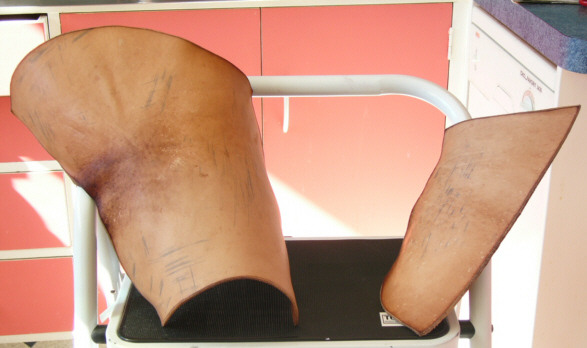
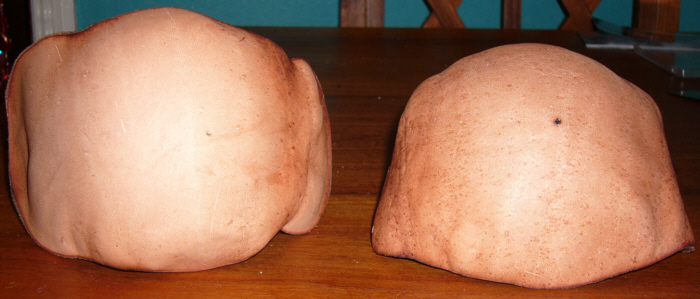
Drying The pieces were dried at room temperature for around 24 hours. This may vary depending on temperature and humidity. You�ll know they are dry if they sound "hollow" when you knock on them. This photo shows both the front and back4 pieces of the dry right cuisse, looking up from the bottom so you can see the curvature. |
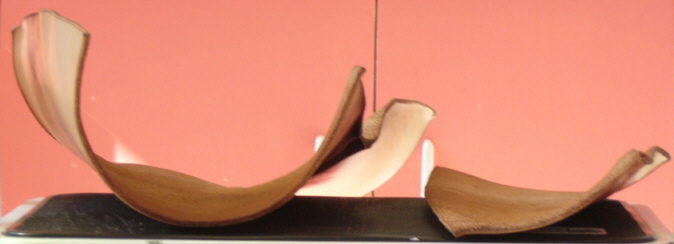 Right leg dry: end view |
|
View of the inside of the front and back pieces of the dry right cuisse, looking up from the bottom so you can see the curvature. The distortion to the front piece is noticeable in the curved edge. |
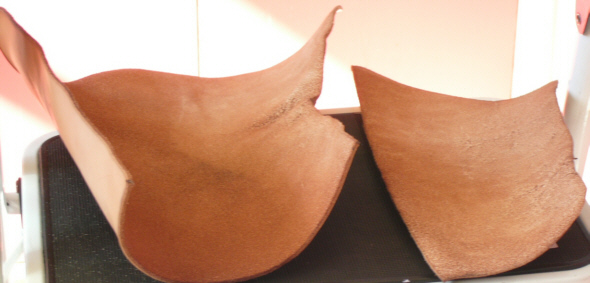 Right leg dry: inside view |
|
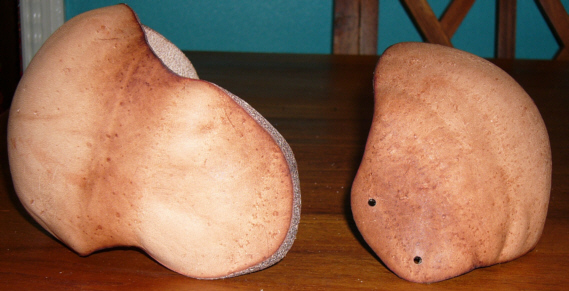
View of the front and back pieces of the dry right cuisse, looking from the outside (the ladder is for photographic purposes only!). |
 Right leg dry: outside view |
|
Assembly |
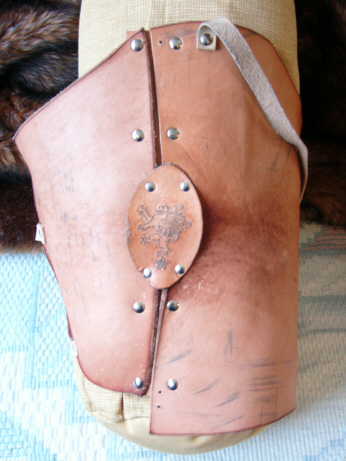 Right cuisse: side view |
|
Close-up of the badge |
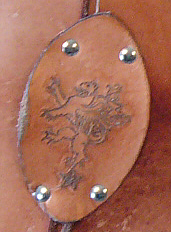 Badge to cover distortion weakness |
|
The left cuisse didn't have the distortion problems the right side did, so the hinging went easily. |
 Left cuisse: side view |
|
The two cuisses side by side for comparison. Note the difference in length between the two caused by the distortion of the right front piece. Initially I decided to leave them as they were and simply adjust for the difference with the hangers, as the left thigh usually takes more attacks than the right. After trialling them in combat, however, I ended up trimming the left front at the bottom in order to get a better fit with the poleyns and lames. |
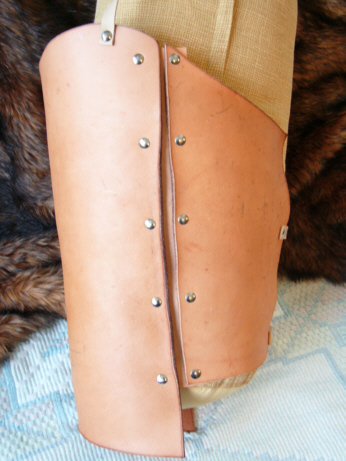
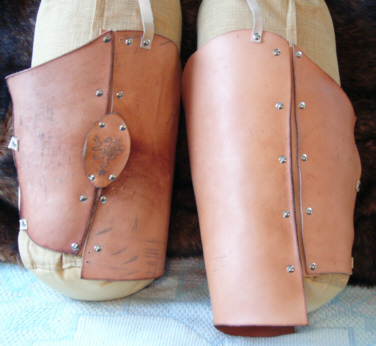 Cuisses: outer thighs |
|
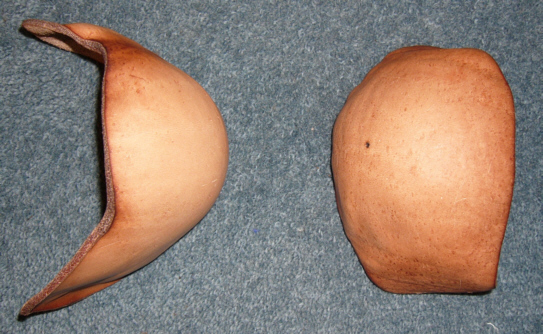
Front views for comparison - note that the flare at the top differs because of the distortion further down. |
 Cuisses: front |
|
Back view showing straps and buckles. Note again the effect of the distortion in the right piece means that the back piece doesn�t wrap quite as far at the left piece does. |
 Cuisses: back |
|
KNEE ARMOUR: Poleyns, Lames, & Padded Cuisses Genouillieres or poleyns appeared at least by the late 1200's as the effigy of Sir John D'Abernoun, 1277, shows5. |
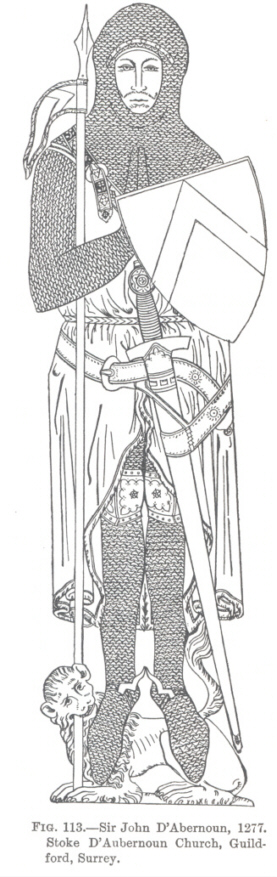 D'Abernoun's Effigy |
|
Process Poleyns require significant shaping and so it was some months before I tackled them. When using steel the poleyns can be gradually and precisely shaped using sinking or dishing. However with cuir bouilli the shape has to be right the first time round. With the experience of the ability of imperfect leather to distort in mind, great care was taken to position the pattern (Sir Paul's) on good leather. Distortion can also work for you, and I decided to try David Friedman's6 suggestion of achieving a dished shape by hardening the poleyns in stages. Briefly: a pin is pushed through the middle of the poleyn from the flesh side of the leather; the pin is held by pliers, and then the leather immersed in stages from the outer edges in. The theory is that the parts which are in the boiling water longer shrink more, so a natural �dish� is achieved. He then finishes the shaping by leaving them to dry between two appropriate sized bowls. Did this work? Overall this worked fairly well, though I was in my non-ideal world still so had no appropriately shaped bowls! I therefore shaped them on my insulated knees. I was also not confident enough that a pin would work, so used a small nail instead. As a result I was left with a small scar where the nail went through the leather. This seems to be a cosmetic rather than a strength issue. Lessons
|
|
|
View of the poleyns from the front. Note the nail holes! |
 Poleyns: front |
|
View of the poleyns from the side showing how the side pieces are positioned. Holes have been drilled in the right-hand one for attaching to padded cuisses. |
 Poleyns: side |
|
View of the poleyns from the top. The left-hand one is near perfect in plane, the right-hand is slightly off. Regardless of these inconsistencies in shape, they actually work well and can even be kneeled on. |
 Poleyns: top |
|
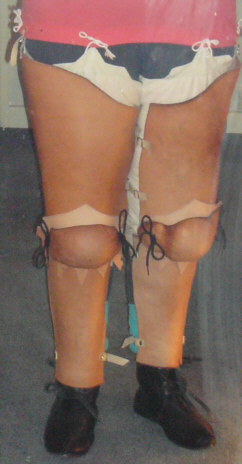
PADDED CUISSES The approach for the padded cuisses was adapted from a pattern by Sir Michael DeLacy (Mike Earl7) and from a photo from Joris de Sutter (of De Liebaart8). Padded cuisses act both as additional protection and to provide a base for attaching poleyns and lames. In practice, I based the pattern on a pair of hose which fitted well, rather than the more segmented approach suggested by Sir Michael. (NB He interprets the lames as �decoration� which I do not think is born out by other authors or by the experience of wearing them � see below.) The construction is of unbleached calico, cotton padding (old towel in this case for maximum air-space:thickness ratio), hand sewn eyelets and silk laces up the back, and finger-woven silk points at the knees and top with brass aiglets at the ends. |
|
|
LAMES The lames are based on Sir Paul Sommerton's patterns (see footnote 1) and modified by extending the bottom lames into five downwards-pointing triangles as seen on some effigies. For example, Ashdown9, discusses the Genouillieres of Sir Thomas Cheyene. (At 1368 this is slightly out of period but is the best illustration I found.) Note: the lames are not cuir bouillied as their main role is articulation of cuir bouilli surfaces which are not of consistent thickness. |
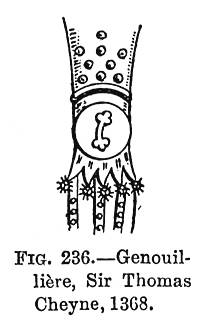 Cheyene's Genouilliere |
|
DEMI-GREAVES Demi-greaves were also based on Sir Paul�s patterns and use the same cuir bouilli processes as for the cuisses. Straps and buckles attached the same way. |
|
|
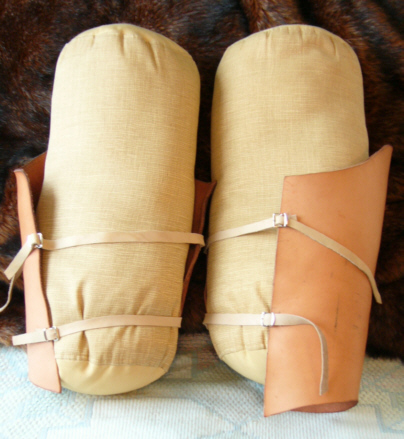
PUTTING IT TOGETHER Note: these photos show the trial positioning of points using shoelaces pinned to the approximate height needed. Once this was set, the silk points were sewn on. |
 Padded Cuisses and Poleyns |
|
I couldn�t find any evidence for padded shins, despite Sir Michael�s pattern. As my boots come up well over the ankle I decided not to worry about padding there. The base of the demi-greaves therefore intentionally make a slight curve out over the tops of my boots. Note: the top of the demi-greaves slide in under the bottom lame before fastening. |
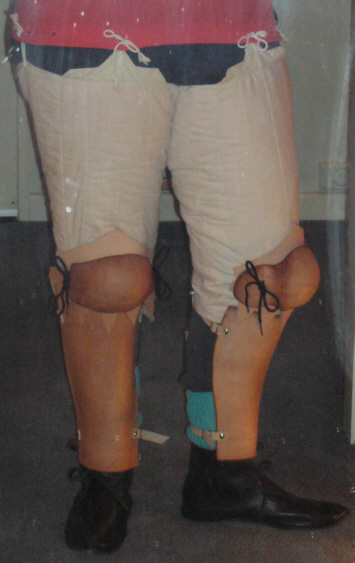 Padded Cuisses, Demi-greaves, and Poleyns |
|
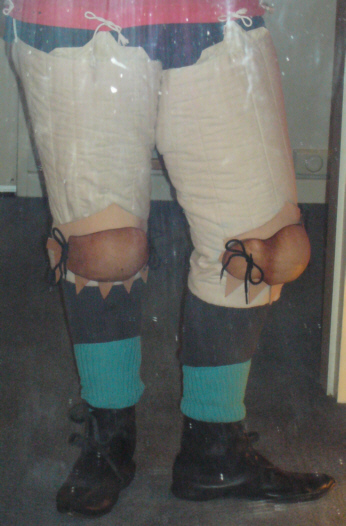
Finally, the cuisses are put on. The best order has proven to be:
The outcome is that all except the inner parts of the thigh, the very back of the knee, and about 1/2 of the back of the calf are armoured. On horse-back very little unarmoured leg would be exposed, and on foot a frontal attack can reach very little unarmoured flesh can be reached. |
 Complete Leg Armour: front |
|
The view from the right side shows the left upper lame opening too far; this was adjusted before the points were permanently attached. (Note - photos taken in mirror so apparent sides are reversed!) |
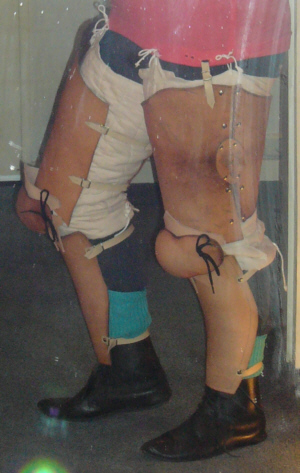 Complete Leg Armour: right side |
|
The left side view shows how far the demi-greaves come down over the boot. |
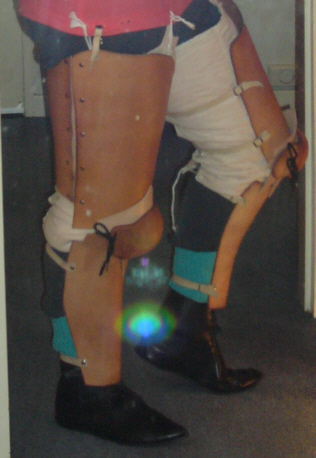 Complete Leg Armour: left side |
|
SEALING THE WORK Although you can go ahead and use the armour at this stage, it is somewhat vulnerable to deterioration if it gets wet. Some people choose to wax or oil the armour, some choose to dye it, I chose to seal it with acrylic paint. For an explanation of that choice go to Part Eight: Notes on Colour. COLOURS
"Genouillieres were invariably of cuir-bouilli, and where illustrated in MSS. or shown in stained-glass windows are of a yellow colour." That fact that yellow ('or') happens to be one of my livery colours was pure co-incidence!
|
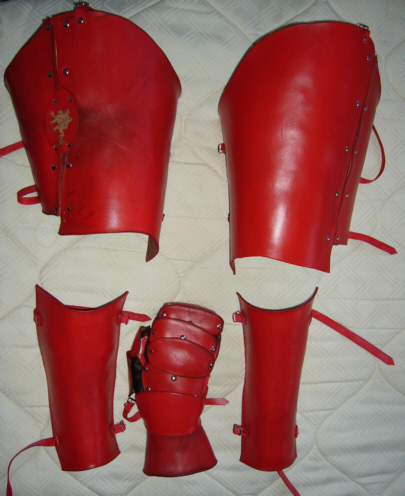 Painted Leg Armour (plus Gauntlet) |
|
FOOTNOTES 1 Sir Paul of Sommerton's patterns found on Daniel Fenwick's page at http://web0.greatbasin.net/%7Efenwick/2 Panty-hose/nylon stockings are useful to stake plants as they don't cut into the soft plant tissue, so they seemed a logical choice for this exercise as the wet leather marks easily. 3 The right thigh was chosen for the first piece as it typically receives less attacks than the left thigh � unless facing a left-handed fighter. This turned out to be a good choice as there were problems with the leather as discussed later in the article. 4 The back pieces went through the same process as the front pieces. In order to ensure they would match the front pieces, they were strapped on with the dry fronts in place to match seams. 5 'An Illustrated History of Arms & Armour'; Ashdown, Charles Henry; Wordsworth Editions Ltd, Hertfordshire; 1988; ISBN 1-85326-914-X, pg 98 6 David Friedman's discussion under 'Experimentation' - http://www.personal.utulsa.edu/%7emarc-carlson/leather/hl.html#cb11 7 In 'Building your own Armour - Part 5: A 14th Century Leg Harness'; http://www.eredsul.org/earl_mike/ArtsofWar.html 8 http://www.liebaart.org/cuisse_e.htm "a Living History and Experimental Archaeology group Belgium (Flanders) which focuses on the �life in Flanders around the year 1302". 9 Ashdown, op cit, Chapter X, 'Camail and Jupon Armour Period 1360-1410', pg 189. He goes on to comment: "Sir Thomas Cheyne, 1368, also has studded cuissarts, and jambarts of studded splints - but his genouillieres are most remarkable and quite unique. The appear to be constructed entirely of cuir-bouilli with pendent tabs of singular form reinforcing the jambarts (Fig 236)". 10 Ashdown, op cit; Chapter IX 'The Studded and Splinted Armour Period 1335-1360', pg 156. | |